FOLLOW This Blog!

Wednesday, June 6, 2018

My Bullet-Smash-Junk-Scrap-Loaded-Journal/Planner!

I've been working on a few business ventures lately and found I was having a few too many moments in need of a soft goosfraba whispered into my ears. I take a lot of deep breaths lately because I am bound and determined to be a successful wife, mom, Mawmaw, writer, blogger, business owner...(Whew! a mouth-full to say and to do!) But, I can do it! I know I can! 


I had this old job search organizer, which is 17 years old. I used it back in the days of wife-ing, mom-ing, working on my career, going to college, volunteering... (Whew! Another mouth full!) Anyhow, I was extremely organized back then, and I haven't used this thing in years. Every time I had thought of throwing it out, the hoarding upcycler in me just couldn't do it! 

*****


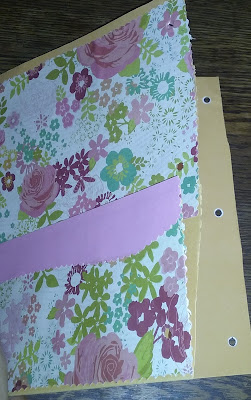
Each page has a pocket. Great for organization, and for inserting lots of goodies. 


*****


I'll be covering the front, back, and each page with some pretty scrapbook paper. But the front and back had a smooth cover film on them, so I pulled that off.


I took the spiral ring off the book to make it easier to work with.


To add durability, and flexibility in my possible decorative direction, I painted the edges with some pretty matte pink paint.

I gathered a bunch of leftover scrapbooking papers and supplies.


I traced the back of my scrapbook paper for size, and cut it out.


Glued the paper on with glue sticks, (I had dozens left over from some previous projects with my grandchildren.)

*****
I glued scrapbook paper, cutouts, and embellishments onto each page.

*****

I had taken the pocket pages from an old spiral notebook bound for the trash, and I covered those as well. I will be adding these with some sort of string or ribbon.


*****

I created some bullet journal pages that would suit my needs. These are just a few of them. I also have one for my Ebay listings, my blogging, meal planning...


The clear pages were part of the original organizer, I will use the one for business cards, and will probably use the large one for pens and markers. 

I added some clear pockets for keepsakes. (Another yard sale find)


*****
I will be adding more memorabilia, photos, and journaling tidbits as I go, but I really like where it's going so far!


*****
I have saved nearly every card I have ever received, and I took some of the more special ones to use in my book. I cut them up to use parts and pieces. They serve as both, special reminders and as decorative accent! I love it!


I created pockets using parts from the cards. 


*****
More parts from the cards. I am creating tabs with some of them that coordinate. I am really enjoying this process; very therapeutic as well as constructive!


*****

I am a huge fan of yard sales, and I found these little plastic page saver sleeves for a dime. There were 8 in the package, and I had a few left from (of course) another project. I slid some card stock down into the sleeves, and punched holes in the card stock to match up with the holes in the plastic sleeves. I will add these in with some ribbon.

*****

I like the last page as is, so I won't be covering it with scrapbook paper. I'm sure I will embellish the heck out of it though! 


*****

The front so far - I haven't added my closure yet. I'm still trying to figure out what I want to use. I've been searching my craft room for the solution because I'm standing strong in my self-challenge to use up my left-overs on this project!
 

 The back so far.

So, this is what I have so far folks! I love every bit of where this is going. I love the perfect imperfections in using the old book with tatters and tears. I will continue to juxtapose the old and the new to create my book of organization and memory keeping!
 I am excited to use this
 bullet-smash-junk-scrap-loaded-journal!

*****
Until next time! 
May your blessings be many and your troubles be few!


Monday, May 28, 2018

Weeping Tree Sonnet

When I was just a little girl, I would lean my back against the trunk of the willow tree in my grandparent's backyard. Shaded by its branches, I would set pen to paper and write my childish poems. I felt protected by the tree that seemed, always, to be crying. In this sonnet I have intimately juxtaposed the life of that tree and the lives beneath that tree, with the emotions of generations to come in my family tree. And humbly, I rejoice that they have wept for me!


*****

The sonnet is my favorite form of poetry, so when my college professor challenged me to write a sonnet, I was ready!

 I knew I specifically wanted to stay true the idea of sonnets of old, written mostly of love and philosophy. I wanted my sonnet to have iambic pentameter, and have four quatrains with an ending couplet, using the abab, cdcd, efef, gg rhyme scheme. I was asked to finish my poem in one week; it took two. This particular sonnet is included in a published work The International Library of Poetry's, Tracing the Infinite. My profile and poem are featured as the first work in the book.

I'm not sure why, but for too long a while, I had quit writing. Today while doing some much needed spring cleaning, I came across the book. With some emotion, a sigh, and a smile, I decided I would take the poem off the shelf and share it with you!


 *****


Weeping Tree


Your tears water the seeds beneath my bones
Traveling the Earth, joining ancestry
Binding the knowledge of yesterdays gone
Graciously promising infinity

Binding futures with your fountain of tears
Branching the heavens in search of our roots
Gracefully keeping in touch with the years
Winds whisper wishes of splintering truths

Locked away skeletons, hidden for shame
Silently pay homage to memories 
Eroded by storms of blood and its stain
Smothering images of destiny

In awe of explanations there may be
Humbly I rejoice you have wept for me

Michelle E LaDuke

*****
© Michelle LaDuke 2015


Sunday, May 20, 2018

Calla Lily & Peacock Feather Wedding

Several years ago, my mother and I opened an event styling business in MS which for some time went very well. My husband and I decided that Florida needed to be our home so, well, no more business in MS. Since we moved back to Florida I have styled about a dozen weddings for family and friends. The most recent wedding I did was for our nephew Brad and his beautiful fiancé Janae. I was responsible for the bouquets, boutonnieres, arbor decor, flower girl basket, ring bearer pillow, and the reception decor

Janae and Brad's Wedding

I created yarn balls to hang from the ceiling.
These are some of the yarn balls as they dry.

*****
 This is a close up of the yarn balls as they were still being hung at the venue.
copyright Trish Bambace


copyrigh Trish Bambace


copyright Trish Bambace


Check out how awesome the smaller yarn balls came out. There is one on each of the tables as well. 
I made the flower girl basket using the same concept as the yarn balls. 

copyright Trish Bambace
And this is the finished flower girl basket! I love it! 

*****


To coordinate with their one of a kind wedding, I created a this ring box...


copyright Trish Bambace


The design of this wedding is based on the peacock feathers, Calla Lilies, and shades of green.  The bride was able to use table cloths that have been loaned to her which are white cloths with moss green overlays. So I have decided to incorporate the moss as part of a theme.
I created these monogrammed T's covered in Spanish Moss to sit on each guest table.

copyright Trish Bambace

Copyright Trish Bambace

copyright Trish Bambace

So I decided to make a six foot version of my table top moss covered T and this was the finished product! A shout out to my hubby for building it for me. There are approximately 4 bags of moss glued onto this thing. The groom really loved it.
*****


copyright Trish Bambace

copyright Trish Bambace
Even though the bouquets were made using mostly silk florals, I think they turned out awesome and the bouquet photographs really well!

*****

There was the maid of honor and 3 brides maids who carried the bouquet in the following photo. I wrapped the stems with ribbon to match the background fabric. 


copyright Trish Bambace
This is two of the bride's maid's bouquets and one of the mother's corsages finished.


copyright Trish Bambace
 Mother's corsage.


copyright Trish Bambace
Boutonniere.

The final cost for my part in this wedding was $680.00 -bridal bouquet, Maid of Honor bouquet, 3 bride's maids bouquets, one tosser, 3 mother's corsages, 5 boutonnieres, 16 centerpieces, 10 floral vases with flowers for the aisle, arbor decor, hanging yarn balls for the ceiling, candles and...I did not put a price on the set up and break down as I did that as well (with the most appreciated help from my Mister, our boys, and their beautiful girlfriends-Thank you all so very much!) 


This wedding took place at Paradise Cove in Orlando.
The wedding was absolutely beautiful! Even though we were setting up and we broke down, my family and I still had the most amazing time in the hours between!

Remember those yarn balls I was making, well there are three of them hanging in the center of the arbor. 

copyright Trish Bambace


Tuesday, May 15, 2018

Wild flowers for my soul!

Wild Phlox and wild florida forest orchids. The Phlox have been growing in every willing field and most roadside shoulders. They are thick and stunning in their showy togetherness. They come up in clusters, especially now while our soil is dry. I have this old enamel ice bucket with a plastic liner in it. The flowers are a little wilted looking because they spent about 20 minutes between ground and water, while I sorted and cut them. 

 Even though the flowers were pretty as they were, I decided to sit the bucket down inside my yellow painted basket. Before I cut the grass in my front yard, I picked some of the Spuranthes tuberosa (or as we call them, wild Florida Forest Orchids.) They look elegantly understated here. And the Phlox are perking up very beautifully too!


*****


I call the little ceramic duck, Flufferduck. (He might be a goose, but that's okay) You never know where you'll find him! He's a wanderer!


Saturday, May 5, 2018

Bottle Tree

A few years back, I created borders around my plants using beer bottles. I had everyone saving their brown. green, and blue bottles for me. I had leftover bottles I had forgotten about until Lisa and I were pilfering around the back 40 for some goodies to salvage for our Margarita Bar. It was an instant no-brainer for both of us: a bottle tree it was!


*****

These were some dirty bottles!

*****


But they cleaned up nicely!

*****

The bottle tree looks great next to our Out door Margarita Bar!

It looks cool at night too!


*****

The blue bottle border...

...I love how it looks around my butterfly bush!

*****

We are still working on the property and the Margarita Bar, so we hope you'll stop in for updates!